The Installation Wizard
Quick Start
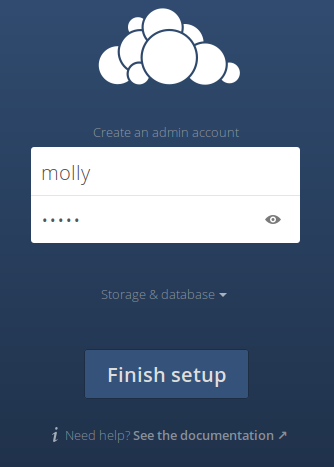
When the ownCloud prerequisites are fulfilled and all ownCloud files are installed, the last step to completing the installation is running the Installation Wizard. This involves just three steps:
- Point your web browser to
http://localhost/owncloud - Enter your desired administrator’s username and password.
- Click “Finish Setup”.
You’re now finished and can start using your new ownCloud server. Of course, there is much more that you can do to set up your ownCloud server for best performance and security. In the following sections we will cover important installation and post-installation steps. Note that you must follow the instructions in Setting Strong Permissions in order to use the occ Command.
In-Depth Guide
This section provides a more detailed guide to the installation wizard. Specifically, it is broken down into three steps:
Data Directory Location
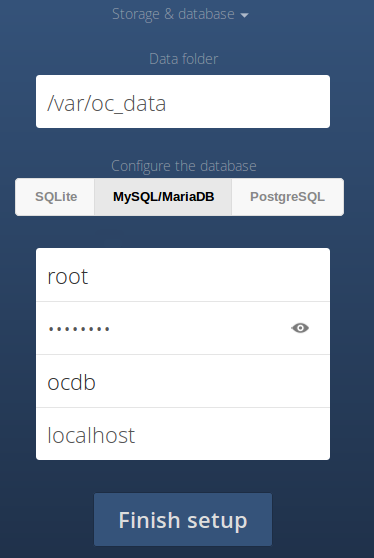
Click “Storage and Database” to expose additional installation configuration options for your ownCloud data directory and database.
You should locate your ownCloud data directory outside of your Web root if you are using an HTTP server other than Apache, or you may wish to store your ownCloud data in a different location for other reasons (e.g. on a storage server).
Warning
Please know that ownCloud’s data directory must be exclusive to ownCloud and not be modified manually by any other process or user.
It is best to configure your data directory location at installation, as it is difficult to move after installation. You may put it anywhere; in this example is it located in /var/oc_data.
This directory must already exist, and must be owned by your HTTP user (see Set Strong Directory Permissions).
Database Choices
When installing ownCloud Server & ownCloud Enterprise editions the administrator may choose one of 4 supported database products. These are:
- SQLite
- MYSQL/MariaDB
- PostgreSQL
- Oracle 11g (Enterprise-edition only)
SQLite
SQLite is the default database for ownCloud Server — but is not supported by the ownCloud Enterprise edition.
Note
SQLite is only good for testing and lightweight single user setups. It has no client synchronization support, so other devices will not be able to synchronize with the data stored in an ownCloud SQLite database.
SQLite will be installed by the ownCloud package and all the necessary dependencies will be satisfied. If you used the package manager to install ownCloud, you may “Finish Setup” with no additional steps to configure ownCloud using the SQLite database for limited use.
MYSQL/MariaDB
MariaDB is the ownCloud recommended database. It may be used with either ownCloud Server or ownCloud Enterprise editions. To install the recommended MySQL/MariaDB database, use the following command:
sudo apt-get install mariadb-server
If you have an administrator login that has permissions to create and modify databases, you may choose “Storage & Database”. Then, enter your database administrator username and password, and the name you want for your ownCloud database. Alternatively, you can use these steps to create a temporary database administrator account.
sudo mysql --user=root mysql
CREATE USER 'dbadmin'@'localhost' IDENTIFIED BY 'Apassword';
GRANT ALL PRIVILEGES ON *.* TO 'dbadmin'@'localhost' WITH GRANT OPTION;
FLUSH PRIVILEGES;
exit
For more detailed information, see MySQL/MariaDB.
PostgreSQL
PostgreSQL is also supported by ownCloud. To install it, use the following command (or that of your preferred package manager):
sudo apt-get install postgresql
In order to allow ownCloud access to the database, create a known password for the default user, postgres, which was added when the database was installed.
sudo -i -u postgres psql
postgres=# \password
Enter new password:
Enter it again:
postgres=# \q
exit
Oracle 11g
Oracle 11g is only supported for the ownCloud Enterprise edition.
Database Setup By ownCloud
Your database and PHP connectors must be installed before you run the Installation Wizard by clicking the “Finish setup” button. After you enter your temporary or root administrator login for your database, the installer creates a special database user with privileges limited to the ownCloud database.
Following this, ownCloud needs only this special ownCloud database user and drops the temporary or root database login.
This new user is named from your ownCloud admin user, with an oc_ prefix, and given a random password.
The ownCloud database user and password are written into config.php:
For MySQL/MariaDB:
'dbuser' => 'oc_dbadmin',
'dbpassword' => 'pX65Ty5DrHQkYPE5HRsDvyFHlZZHcm',
For PostgreSQL:
'dbuser' => 'oc_postgres',
'dbpassword' => 'pX65Ty5DrHQkYPE5HRsDvyFHlZZHcm',
Click Finish Setup, and you’re ready to start using your new ownCloud server.
Post-Installation Steps
Now we will look at some important post-installation steps. For hardened security we recommend setting the permissions on your ownCloud directories as strictly as possible, and for proper server operations. This should be done immediately after the initial installation and before running the setup.
Your HTTP user must own the config/, data/ and apps/ directories so that you can configure ownCloud, create, modify and delete your data files, and install apps via the ownCloud Web interface.
You can find your HTTP user in your HTTP server configuration files, or you can use PHP Version and Information (Look for the User/Group line).
- The HTTP user and group in Debian/Ubuntu is
www-data. - The HTTP user and group in Fedora/CentOS is
apache. - The HTTP user and group in Arch Linux is
http. - The HTTP user in openSUSE is
wwwrun, and the HTTP group iswww.
Note
When using an NFS mount for the data directory, do not change its ownership from the default. The simple act of mounting the drive will set proper permissions for ownCloud to write to the directory. Changing ownership as above could result in some issues if the NFS mount is lost.
The easy way to set the correct permissions is to copy and run this script.
Replace the ocpath variable with the path to your ownCloud directory.
Replace the ocdata variable with the path to your ownCloud data directory.
Replace the htuser and htgroup variables with your HTTP user and group:
#!/bin/bash
ocpath='/var/www/owncloud'
ocdata='/var/www/owncloud/data'
htuser='www-data'
htgroup='www-data'
rootuser='root'

printf "Creating possible missing Directories\n"
mkdir -p $ocdata
mkdir -p $ocpath/updater

printf "chmod Files and Directories\n"
find ${ocpath}/ -type f -print0 | xargs -0 chmod 0640
find ${ocpath}/ -type d -print0 | xargs -0 chmod 0750
find ${ocdata}/ -type f -print0 | xargs -0 chmod 0640
find ${ocdata}/ -type d -print0 | xargs -0 chmod 0750

printf "chown Directories\n"
chown -R ${rootuser}:${htgroup} ${ocpath}/
chown -R ${htuser}:${htgroup} ${ocpath}/apps/
chown -R ${htuser}:${htgroup} ${ocpath}/config/
chown -R ${htuser}:${htgroup} ${ocdata}/
chown -R ${htuser}:${htgroup} ${ocpath}/themes/
chown -R ${htuser}:${htgroup} ${ocpath}/updater/

chmod +x ${ocpath}/occ

printf "chmod/chown .htaccess\n"
if [ -f ${ocpath}/.htaccess ]
 then
  chmod 0644 ${ocpath}/.htaccess
  chown ${rootuser}:${htgroup} ${ocpath}/.htaccess
fi
if [ -f ${ocdata}/.htaccess ]
 then
  chmod 0644 ${ocdata}/.htaccess
  chown ${rootuser}:${htgroup} ${ocdata}/.htaccess
fi
If you have customized your ownCloud installation and your filepaths are different than the standard installation, then modify this script accordingly.
This lists the recommended modes and ownership for your ownCloud directories and files:
- All files should be read-write for the file owner, read-only for the group owner, and zero for the world
- All directories should be executable (because directories always need the executable bit set), read-write for the directory owner, and read-only for the group owner
- The
apps/directory should be owned by[HTTP user]:[HTTP group] - The
config/directory should be owned by[HTTP user]:[HTTP group] - The
themes/directory should be owned by[HTTP user]:[HTTP group] - The
data/directory should be owned by[HTTP user]:[HTTP group] - The
[ocpath]/.htaccessfile should be owned byroot:[HTTP group] - The
data/.htaccessfile should be owned byroot:[HTTP group] - Both
.htaccessfiles are read-write file owner, read-only group and world
These strong permissions prevent upgrading your ownCloud server; see Setting Permissions for Updating for a script to quickly change permissions to allow upgrading.